As you are here on this post, we guess you have purchased a Rockspace AC1200 smart router. If this is correct, congrats, you have made a great decision to invest in this revolutionary home WiFi system. It is amazing overall and you can certainly expect exceptional performance from it. However, before you move ahead to utilize it, it is important to know your device’s important features and functionalities. A user manual is always the right option to learn about your device. But if it is complex to understand for you, this comprehensive user manual guide is for you.
Here, you will be learning about the core features & functions of the device and how to easily perform the Rockspace router setup procedure.
Let’s dive into the configuration process!
Introduction Of The Device
Rockspace AC1200 smart router is a new generation dual-band home WiFi system that allows homeowners to enjoy an uninterrupted internet connection. The data transmission speed of the device is up to 1200 Mbps which is quite good for a fast internet connection.
The major advantage of this 11AC technology-based router is that it has the immense potential to eliminate all WiFi dead zones. It doesn’t matter how far you want your home network to reach, Rockspace Router AC1200 can reach even the backyard of your home. You can enjoy online HD streaming and play online video games smoothly with this.
Top Features Of Rockspace AC1200
Dual-Band Frequency (2.4 GHz and 5 GHz)
Data Transmission Speed Up To 1200 Mbps
WPA & PSK Security
User Interface Access Through IP or URL
DHCP Client Support
1000 Mbps LAN and WAN Ports
Access Point and Wireless Router Support
Dual-Band Antenna
Built-In Firewall
Super Easy Login and Setup
Detailing Panel Layouts Of The Device
Every router usually has two panels; a front panel and a rear panel. These panels include a few LED lights, buttons, and ports. Let’s start with the front panel layout of your AC1200 smart home Rockspace WiFi router.
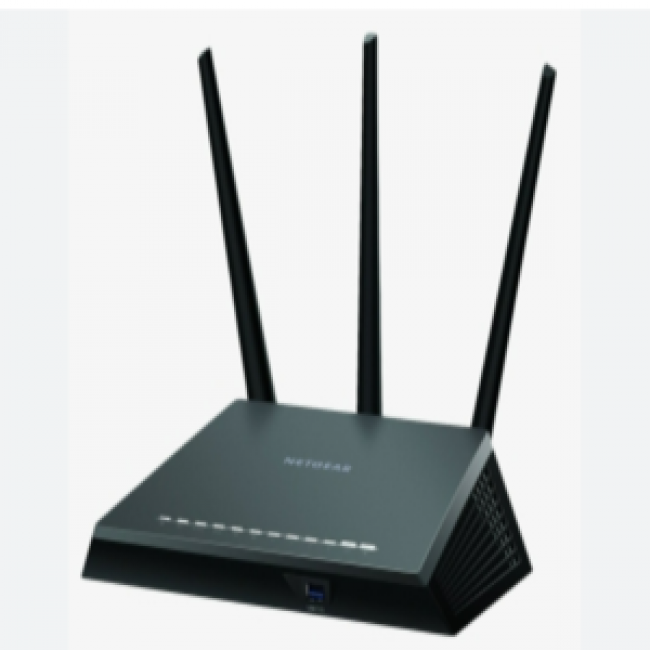
Front Panel Detailing
The front panel of the AC1200 model from Rockspace consists of 5 LED lights. These LEDs have different names and they are one kind of indicator in the device which shows the status of the connection.
There is one Power LED on the front panel. This LED lights up when you plug in your device and turn on the switch. The second one is recognized as WPS LED. This indicates whether your router paired successfully or not. Then there is a WLAN LED which indicates when there are one or more devices connected to the router and data transmission is on. WAN is another LED on the front panel of the device which functions in two different ways. It lights up when the WAN port connects successfully while it blinks when data transmission is happening through the WAN port.
Rear Panel Detailing
The rear panel of the device consists of one WAN port, three LAN ports, one power socket, one on/off button, and one WPS and Reset button as well. These all make up the rear panel of your Rockspace AC1200 smart WiFi router.
Here, a power socket is used to supply the power to the router. LAN ports are for connecting different devices to the router via an ethernet cable while WAN port is for accessing the internet. The WPS button on the panel helps to perform the setup process while the reset button can be used to reset the router setting to default factory settings. There is an on/off button also on the panel which you can use to power on the device.
Rockspace Router AC1200 Installation
The Rockspace Router installation process is crucial. It should be done correctly or else you might encounter certain errors and issues later. Here are the steps to correctly install your Rockspace AC1200 router.
Establish a connection Between Your Modem and ADSL Filter (use an RJ11 network cable)
Establish a Connection Between ADSL and Router. The LAN port of ADSL should connect to the WAN port of your router (use an RJ45 network cable)
Connect your device (PC or Laptop) to any of the LAN ports on the Rear Panel of your router
Attach the power cable to the router and then plug in the power adapter to a power outlet.
The installation process is almost done. You simply need to verify if the installation has been done correctly. Turn on your router, connect it to your computer, and then check if your system finds the network.
Rockspace AC1200 Setup Process
There are more than a couple of Rockspace Router setup options provided by the brand for this device. The WPS setup option is the fastest and easiest one. Go with this setup option straightaway if you don’t want to get yourself into a complex procedure. Other setup options include App-based and Web-based configurations.
WPS Configuration Method
This is a straightaway procedure. You just need to press the WPS button on the rear panel of the router to set up this device and establish a successful connection with your computer or laptop.
We hope after reading this article your Rockspace router setup procedure will complete successfully. If not, then contact our experts.
There is one Power LED on the front panel. This LED lights up when you plug in your device and turn on the switch. The second one is recognized as WPS LED. This indicates whether your router paired successfully or not. Then there is a WLAN LED which indicates when there are one or more devices connected to the router and data transmission is on. WAN is another LED on the front panel of the device which functions in two different ways. It lights up when the WAN port connects successfully while it blinks when data transmission is happening through the WAN port.
Rear Panel Detailing
The rear panel of the device consists of one WAN port, three LAN ports, one power socket, one on/off button, and one WPS and Reset button as well. These all make up the rear panel of your Rockspace AC1200 smart WiFi router.
Here, a power socket is used to supply the power to the router. LAN ports are for connecting different devices to the router via an ethernet cable while WAN port is for accessing the internet. The WPS button on the panel helps to perform the setup process while the reset button can be used to reset the router setting to default factory settings. There is an on/off button also on the panel which you can use to power on the device.
Rockspace Router AC1200 Installation
The Rockspace Router installation process is crucial. It should be done correctly or else you might encounter certain errors and issues later. Here are the steps to correctly install your Rockspace AC1200 router.
Establish a connection Between Your Modem and ADSL Filter (use an RJ11 network cable)
Establish a Connection Between ADSL and Router. The LAN port of ADSL should connect to the WAN port of your router (use an RJ45 network cable)
Connect your device (PC or Laptop) to any of the LAN ports on the Rear Panel of your router
Attach the power cable to the router and then plug in the power adapter to a power outlet.
The installation process is almost done. You simply need to verify if the installation has been done correctly. Turn on your router, connect it to your computer, and then check if your system finds the network.
Rockspace AC1200 Setup Process
There are more than a couple of Rockspace Router setup options provided by the brand for this device. The WPS setup option is the fastest and easiest one. Go with this setup option straightaway if you don’t want to get yourself into a complex procedure. Other setup options include App-based and Web-based configurations.